How to create custom tags in eZ Publish 5
By: Ernesto Buenrostro | March 10, 2016 | eZ Publish development tips
Custom tags are very useful for adding custom functionality to rich text fields beyond simple formatting and embeds. Here is a walkthrough of how to implement custom tags in eZ Publish 5.x compared to an eZ Publish 4.x / legacy install.
With the eZ Publish 5.x "new stack" the way to turn editorial data in custom tags into front-end HTML is to use XSLT. Let's start with a simple example: embedding YouTube videos.
Currently both eZ Publish kernels (legacy and new stack) are involved; we need the legacy kernel to make our new YouTube video custom tag available in the Administration Interface and the new stack for the front-end display.
In the legacy stack we need to edit overrides of content.ini and ezoe_attributes.ini files to let eZ Publish know what information (name and fields) needs to be stored. We'll use a simple use case, where the editor just needs to paste in the video ID and there will be a fixed height and width.
In an override of content.ini.append.php, we define the custom tag as follows:
[CustomTagSettings]
AvailableCustomTags[]=youtube_video
CustomTagsDescription[youtube_video]=YouTube Video
IsInline[youtube_video]=false

[youtube_video]
CustomAttributes[]=video_id
ClassDescription[video_id]=Video ID
In an override of ezoe_attributes.ini.append.php, we configure the video ID field:
[CustomAttribute_youtube_video_video_id]
Name=YouTube video ID
Title=YouTube video ID
Type=text
AllowEmpty=false
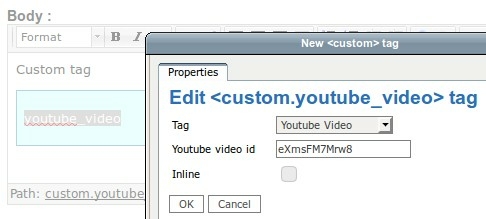
We should then have the option to use this new custom tag in a rich text / XML block field:
Now let's get to the front-end display of the YouTube video. In eZ Publish legacy, we would use a template that looks like this:
<iframe type="text/html" width="720" height="405" frameborder="0" allowfullscreen="" src="https://www.youtube.com/embed/{$video_id}"></iframe>In the new stack, we have to first define the path to our custom XSL file in an ezpublish.yml file (loaded in a bundle or in the main configuration folder).
ezpublish:
    system:
        eng:
            fieldtypes:
                ezxml:
                    custom_tags:
                        - { path: %kernel.root_dir%/../src/test/BaseBundle/Resources/custom_tags.xsl, priority: 10 }
Presuming our bundle is called "test", we then create src/test/BaseBundle/Resources/custom_tags.xml with the following code:
<?xml version="1.0" encoding="UTF-8"?>
<xsl:stylesheet
    version="1.0"
    xmlns:xsl="http://www.w3.org/1999/XSL/Transform"
    xmlns:xhtml="http://ez.no/namespaces/ezpublish3/xhtml/"
    xmlns:custom="http://ez.no/namespaces/ezpublish3/custom/"
    xmlns:image="http://ez.no/namespaces/ezpublish3/image/"
    exclude-result-prefixes="xhtml custom image">

    <xsl:output method="html" indent="yes" encoding="UTF-8"/>

    <xsl:template match="custom[@name='youtube_video']">
        <iframe type="text/html" width="720" height="405" frameborder="0" allowfullscreen="">
            <xsl:attribute name="src">
                <xsl:value-of select="concat('https://www.youtube.com/embed/', @custom:video_id)"/>
            </xsl:attribute>
        </iframe>
    </xsl:template>

</xsl:stylesheet>
With this configured, the custom tag will automatically be rendered whenever it is used in a rich text field, such as an article body:
{{ ez_render_field( content, 'body' ) }}The HTML output for the custom tag will thus look like this:
<iframe type="text/html" width="720" height="405" frameborder="0" allowfullscreen="" src="https://www.youtube.com/embed/FwF6mie6oIA"></iframe>
Getting the ID of the host article
Sometimes XSL is not enough. Let's suppose the custom tag needs to know the ID of the article in which it is used. One example of this is if we want to display a list of related articles within the article, to provide a "more like this" widget based on the current article. To keep the example simple we'll just grab 5 other articles of the same content type, although there are much more sophisticated ways to do this.
A custom tag is used so that the editor can determine the placement of this related article list within the body of an article. In eZ Publish legacy, we had direct access to the content node by using the $#node variable. In the new stack, we need to implement a filter (called xml_convert) to pass the content object containing the custom tag. This filter will get the necessary information before passing it to the default eZ Publish Twig function xmltext_to_html5 that renders a rich text field. The template code will look something like this:
{{ ez_field_value(content, 'body').xml|xml_convert(content.id)|xmltext_to_html5 }}We still need to edit an override of content.ini.append.php to make the custom tag available to editors:
[CustomTagSettings]
AvailableCustomTags[]=more_like_this
CustomTagsDescription[more_like_this]=More like this
IsInline[more_like_this]=false
Next, let's create a new Twig extension in our bundle at src/Test/BaseBundle/Twig/TestTwigExtension.php. We start by registering some new services:
services:
    test.twig.test_twig_extension:
        class: Test\BaseBundle\Twig\TestTwigExtension
        arguments: [@service_container, @ezpublish.templating.global_helper]
        tags:
            - { name: twig.extension }

    test.ezxml.converter:
        class: Test\BaseBundle\Services\XMLConverter
        arguments: [@service_container, @ezpublish.templating.global_helper]
Then in TestTwigExtension.php we define our Twig filter xml_convert that simply calls our pre-converter:
<?php
namespace Test\BaseBundle\Twig;

use \Symfony\Component\DependencyInjection\Container;

/**
 * Collection of Twig helpers
 *
 */

class TestTwigExtension extends \Twig_Extension
{

    /** @var Container */
    protected $container;

    public function __construct(Container $container)
    {
        $this->container = $container;
    }

    public function getName()
    {
        return 'test_twig_extension';
    }

    /**
     * Returns a list of filters to add to the existing list.
     *
     * @return array An array of filters
     */
    public function getFilters()
    {
        return array(
            new \Twig_SimpleFilter( 'xml_convert', array($this, 'xmlConvertFilter') ),
        );
    }

    /**
     * Renders a XMLBlock passing the content object id
     *
     * @return array An array of filters
     */
    public function xmlConvertFilter( $XMLDoc, $contentId )
    {
        if (!is_numeric($contentId) || $contentId <= 0) {
            $contentId = false;
        }

        $xmlConverter = $this->container->get('test.ezxml.converter'); /* @var $xmlConverter \Test\BaseBundle\Services\XMLConverter */

        return $xmlConverter->convert($XMLDoc, $contentId);
    }
}
The pre-converter does the search query for related articles based on the current article. The results of the query are formatted as individual tags each named more_like_this_item.
<?php

namespace Test\BaseBundle\Services;

use \Symfony\Component\DependencyInjection\ContainerInterface;
use \eZ\Publish\API\Repository\Values\Content\LocationQuery;
use \eZ\Publish\API\Repository\Values\Content\Query\Criterion;

/**
 * eZXML pre-processor class
 */
class XMLConverter
{

    /** @var ContainerInterface */
    private $container;

    /** @var \eZ\Publish\API\Repository\Repository */
    private $repository;

    /**
     * Class constructor
     *
     * @param ContainerInterface $container The container to be used
     */
    function __construct( ContainerInterface $container )
    {
        $this->container = $container;
        $this->repository = $this->container->get( 'ezpublish.api.repository' );
        $this->contentService = $this->repository->getContentService();
    }

    /**
     * This method pre-processes a eZXML Document
     *
     * @param \DOMDocument $XMLDoc Document to process
     * @param int $contentId Content Object Id
     * @return \DOMDocument Pre-processed document
     */
    public function convert( \DOMDocument $XMLDoc, $contentId )
    {
        $xpath = new \DOMXPath( $XMLDoc );
        $content = $this->contentService->loadContent( $contentId );

        if ($contentId) {
            $elements = $xpath->query("//custom[@name='more_like_this']");
            if ($elements->length) {
                $moreLikeThisNode = $elements->item(0);

                $searchService = $this->repository->getSearchService();
                $query = new LocationQuery();
                $query->query = new Criterion\LogicalAnd([
                    new Criterion\ContentTypeId( $content->contentInfo->contentTypeId ),
                    new Criterion\Location\IsMainLocation(Criterion\Location\IsMainLocation::MAIN),
                ]);
                $query->limit = 5;
                $searchResult = $searchService->findLocations( $query );
                foreach ( $searchResult->searchHits as $searchHit ) {
                    $itemLocation = $searchHit->valueObject; /* @var $itemLocation \eZ\Publish\API\Repository\Values\Content\Location */
                    $moreLikeThisElement = $XMLDoc->createElement('custom');
                    $moreLikeThisElement->setAttribute('name', 'more_like_this_item');
                    $moreLikeThisElement->setAttribute('title', $itemLocation->contentInfo->name);
                    $moreLikeThisElement->setAttribute('url', $this->container->get('router')->generate($itemLocation));
                    $moreLikeThisNode->appendChild($moreLikeThisElement);
               }

           }

       }

       return $XMLDoc;
    }

}
Finally, in our custom_tags.xsl file we can convert the data elements into HTML!
<xsl:template match="custom[@name='more_like_this']">
    <ul>
        <xsl:apply-templates />
    </ul>
</xsl:template>
<xsl:template match="custom[@name='more_like_this_item']">
    <h2>Related articles</h2>
    <li>
        <a>
            <xsl:attribute name="href">
                <xsl:value-of select="@url" />
            </xsl:attribute>
            <xsl:value-of select="@title" />
        </a>
    </li>
</xsl:template>
Here is an example of the "more like this" widget:


